Categories
General

Running GPT-OSS on OpenShift AI with a Custom Serving Runtime

Deploying large language models (LLMs) like the newly released GPT-OSS 20B on a platform like Red Hat OpenShift AI offers a robust and scalable solution for production environments but it can take time before you are able to run it with the out-of-the-fox vLLM serving runtime. If you are like me and want to try the latest and greatest to not feel so left out we can use a custom Serving Runtime. This guide outlines the process of deploying a GPT-OSS model by creating and configuring a custom Serving Runtime on OpenShift AI.

The Challenge: Model-Version Mismatch

As new open-source models like GPT-OSS are released, they often introduce new architectures and optimizations that require the latest versions of inference servers to function correctly. A prime example is the newly released GPT-OSS 20B and 120B models.

Unfortunately, the default vLLM Serving Runtime version 0.9.0.1 provided out-of-the-box with OpenShift AI, does not have the necessary support for these new models. Attempting to deploy the GPT-OSS model on this older runtime will have to running into errors due to it’s new architecture GptOssForCausalLM.

To solve this, we must create a custom Serving Runtime using a newer version of vLLM, specifically 0.10.1+gptoss, which has been updated to include support for the GPT-OSS model’s unique architecture.


Understanding the Components

Before we dive into the steps, it’s important to understand the core components involved:

  • OpenShift AI: This is a platform for building, training, and serving AI/ML models. It provides the infrastructure, tools, and a web console to manage the entire AI lifecycle.
  • Serving Runtime: This is the container image that serves your model. It includes the inference server, model files (if you’d like), and any necessary dependencies. Using a custom runtime allows you to use a specific inference server, like vLLM or Hugging Face Text Generation Inference, which are optimized for LLM serving.
  • GPT-OSS: This is a new open-source LLM series, and for this guide, we’ll provide you a OCI container containing the new 20B model. (I’m GPU poor, so it’s all I can test today…)
  • InferenceService: This is a Kubernetes custom resource that defines the deployment of your model. It specifies the Serving Runtime to use, the model’s location, and other serving configurations.

Step 1: Using a Pre-built Container Image

To make things easier, we’ll use my pre-built container image from quay.io that already includes a compatible vLLM version. This bypasses the need for you to build the image yourself, allowing you to get up and running faster.

quay.io/castawayegr/vllm:0.10.1-gptoss

This image is configured with vLLM version 0.10.1 and is ready to serve GPT-OSS models.


Step 2: Defining the Custom Serving Runtime on OpenShift AI

Once your image is ready, you need to define the custom Serving Runtime in your OpenShift AI project. This tells the platform how to use your custom image to serve models.

  1. Navigate to the OpenShift AI Web Console: Log in with a user who has admin privileges.
  2. Access Serving Runtimes: Go to Settings -> Serving Runtimes and click Add Serving Runtime.
  3. Create from scratch: You will use a YAML definition to configure the runtime. Paste the YAML below.

YAML

apiVersion: serving.kserve.io/v1alpha1
kind: ServingRuntime
metadata:
  annotations:
    opendatahub.io/recommended-accelerators: '["nvidia.com/gpu"]'
    opendatahub.io/runtime-version: v0.10.1
    openshift.io/display-name: GPT-OSS vLLM with BitsandBytes NVIDIA GPU ServingRuntime for KServe
    opendatahub.io/apiProtocol: REST
  labels:
    opendatahub.io/dashboard: "true"
  name: vllm-cuda-runtime-gptoss
spec:
  annotations:
    prometheus.io/path: /metrics
    prometheus.io/port: "8080"
  containers:
    - args:
        - --port=8080
        - --model=/mnt/models
        - --served-model-name={{.Name}}
      command:
        - python
        - -m
        - vllm.entrypoints.openai.api_server
      env:
        - name: HF_HOME
          value: /tmp/hf_home
      image: quay.io/castawayegr/vllm:0.10.1-gptoss
      name: kserve-container
      ports:
        - containerPort: 8080
          protocol: TCP
  multiModel: false
  supportedModelFormats:
    - autoSelect: true
      name: vLLM

Apply this YAML to your cluster, and the new runtime will appear in the list of available Serving Runtimes.


Step 3: Deploying the GPT-OSS Model via the Web Console

With the custom Serving Runtime now available, you can easily deploy your GPT-OSS model using the OpenShift AI web console.

  1. Go to the Models and Model Servers page: From the OpenShift AI dashboard, navigate to the Models and Model Servers section.
  2. Start the deployment process: Click the Deploy model button.
  3. Fill out the deployment form: You’ll be presented with a form to configure your model deployment.
  4. Model Name: Give your model a unique name, e.g., gpt-oss.
  5. Model Server Size: Select an appropriate size for your model. I used the Large size in my deployment but do what’s best for your environment.
  6. Accelerator: Select NVIDIA GPU for your accelerator.
  7. Serving Runtime: This is the most crucial step! From the dropdown menu, select the new custom runtime you created in Step 2: GPT-OSS vLLM with BitsandBytes NVIDIA GPU ServingRuntime for KServe.
  8. Model Location: You will need to specify the storage location of your model weights. Select an existing data connection (S3, PVC, etc.) or create a new one. For my deployment I have a connection for quay.io. Selecting that gives me the option for OCI storage location, here I will input OCI image I created for the 20B model:
    quay.io/castawayegr/modelcar-catalog:gpt-oss-20b
  9. Configuration parameters: You will need to add Additional serving runtime arguments that at minimal point to chat template for the model. If you are using my modecar image from step 8, you can just add the following:
    --chat-template=/app/data/template/template_gptoss.jinja
    --max-model-len=464
    Note: Using a 16GB vRAM GPU you won’t get a lot of context length, vLLM automatically calculated about 464 tokens for me. Adjust the –max-model-len for your hardware.
  10. Deploy the model: Click Deploy. OpenShift AI will now use your custom runtime to create a pod, load the GPT-OSS model, and expose it as a scalable service. You can monitor the deployment status on the Models and Model Servers page.

If all goes well, your endpoint should become available and you now can test GPT-OSS on OpenShift AI!


Conclusion

By using my pre-built container image and the user-friendly OpenShift AI web console, you can quickly and efficiently deploy the newly released GPT-OSS models!
Categories
Containers Github OpenShift Red Hat

OCP & Private Github Repos

So you have your OpenShift 4.x cluster deployed, now it’s time to deploy some code. In this post I will describe how to get started deploying your code from private repos hosted on GitHub.

First let’s create a specific ssh key just for this use. If you have a linux system you can do this by running the following command.

ssh-keygen -t rsa -b 4096 -C "mike@example.com"

This will generate your private and public key you will use for the project. Next we need to add the newly created public key to deploy keys section for the repo we want to deploy from at Github; you can do that by following the tutorial here.

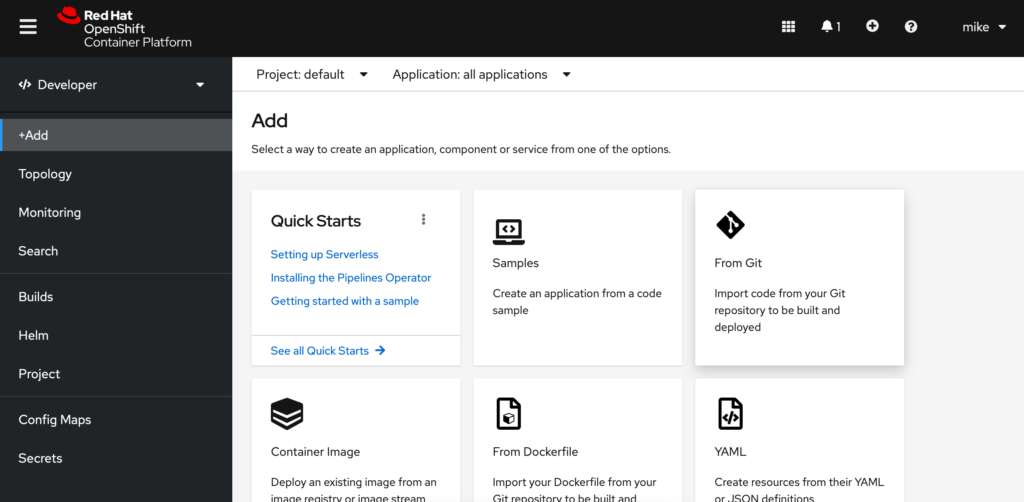
Now that you have done this we need to add our private key to our OpenShift project to be able to run the code on our cluster. From your project click the Add option from the left hand menu. Then we want to choose From Git.

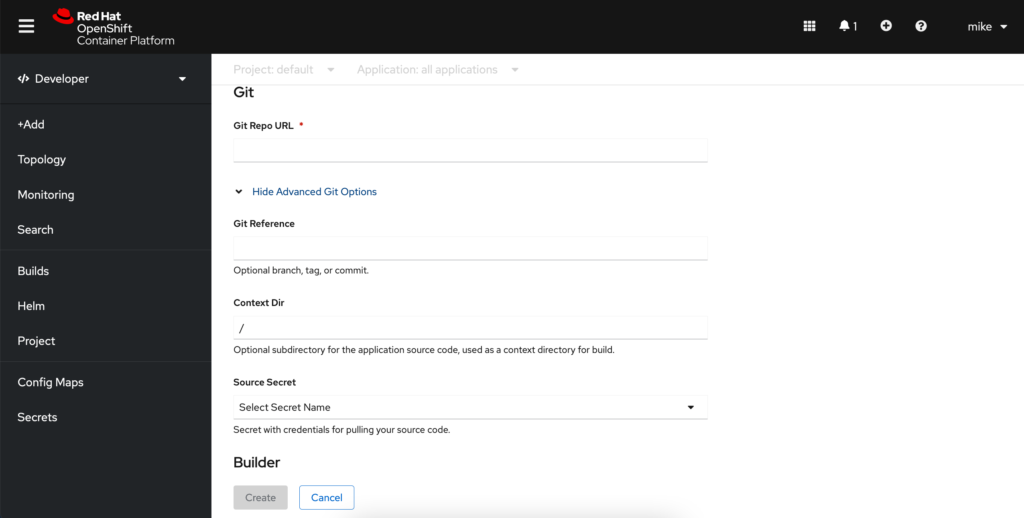
Next we will input our git project ssh url into the Git Repo URL field, followed by clicking the Show Advanced Git Options. Here we will need to add our private ssh key we generated earlier by clicking Select Secret Name followed by Create New Secret.

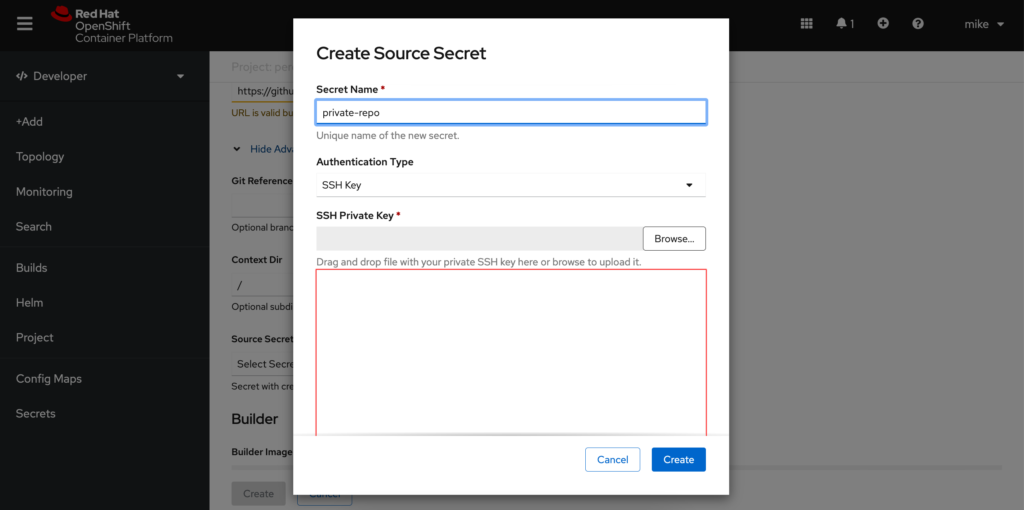
This will bring us to the screen where we want to add our private key to OpenShift as a new secret. We can do this by choosing SSH Key from the Authentication Type drop down menu and naming our new secret and pasting our ssh private key into the field and clicking create.

Select your builder image, name, and any advanced options and click Create. Your project should be deployed after a bit of time.

-Mike

Categories
OpenShift Red Hat

Adjusting OCP worker node resources

Let’s say that you deployed your OpenShift cluster with all the defaults using the installer provisioned infrastructure method. Not only that but you’ve got your some workloads already deployed but you want to adjust all the resources available to the underlying worker node VMs. How do you do that? I will detail those steps in this article!

You will need to figure out what the minimal worker node count that is needed to run your workloads. In this example we will use one but this will work if you have more. You could simply increase the replica count after adjusting the machineset instead.

First we will need to get the name of the machineset we will be altering.

oc get machinesets -n openshift-machine-api

Then we will scale the worker nodes to one replica in this example using the machineset name from the above command (ocp4-tkqrm-worker).

oc scale --replicas=1 ocp4-tkqrm-worker -n openshift-machine-api

Now let’s get the name of the worker node(s) that is/are left. We will use this later to delete those machines after we have edited our resources and scaled our cluster back up. Make sure to take the name of them down or run in a separate terminal to reference later when we remove them.

oc get nodes

Now let’s edit our machineset resources to whatever we like using the following command.

oc edit machineset ocp4-tkqrm-worker -n openshift-machine-api

Once you have edited the machineset we need to scale it back up. This will deploy all new worker nodes with the newly adjusted resource requirements. Note left over worker node resources will not change and this is why we need to delete them later in the tutorial.

oc scale --replicas=3 ocp4-tkqrm-worker -n openshift-machine-api

Once the new machines are deployed and operational displaying the ready status using the oc get nodes command; we can delete the older worker nodes.

oc delete machine ocp4-tkqrm-worker-dzrvt -n openshift-machine-api

Note the above command will take a while to run while it drains the node of any pods that are running. Once the command completes, your cluster should have all new worker nodes with the newly specified resources!

-Mike

Categories
OpenShift Red Hat

Manually scaling an OCP IPI Cluster

In this article I will discuss how to manually scale an OpenShift IPI up or down depending on your needs. It is very easy to do with the oc binary via the command line. Whether you need to scale up your worker nodes to support more workloads or scale down to save on costs it can be done with one command.

First we need to login to our cluster via the oc command line utility.

oc login https://api.ocp4.example.com:6443

Next we need to get the name of the machineset for our cluster that we will be scaling.

oc get machinesets -n openshift-machine-api

This will return the name of our machinset as seen in the screenshot below.

Then we can run the following command to scale the cluster up or down adjusting the replicas=X portion of the command. Where X is the number of replicas to scale up or down to. You also need to adjust the machineset name to the one from the above command.

oc scale --replicas=4 ocp4-tkqrm-worker -n openshift-machine-api

You can use the oc get command from above to watch for the additional nodes to be added or removed depending on what you choice to do this will take some time. Do note that you can NOT scale to zero worker nodes without moving the router pods.

-Mike

Categories
OpenShift Red Hat Virtualization

Custom OpenShift VMWare IPI Deployments

In the past few posts I have written how to do some basic setup tasks once you have a OpenShift deployment up and running. I figured I should backpedal a little here and discuss how to do a custom OpenShift deployment on VMWare using the IPI deployment method.

To start when you do a basic deployment of OpenShift with the openshift-install binary you get a basic cluster with 3x supervisor nodes and 3x worker nodes. While this is great for folks interested in just getting to know OpenShift, if you are deploying production workloads you may want to increase the supervisor/worker node counts.

By default the 3x worker nodes are deployed 2x CPU counts with a single core on each socket, 8GB of RAM, and 120GB hard drive. Well if you wanted to increase these default values, you are in luck; I will detail that process below!

First we need to create a directory to hold our custom install-config.yml and installation files for our cluster.

mkdir install-dir

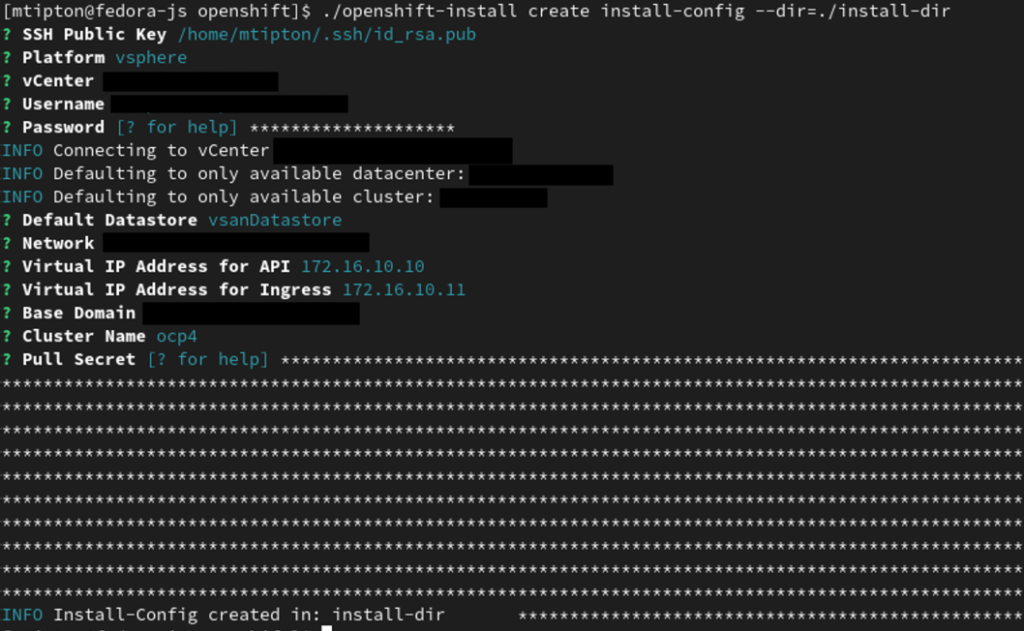
Next we want to create our custom install-config.yml used to spin up our custom OpenShift cluster deployment. We can do this using the openshift-install cli tool by running the following command and filling in all the necessary information about our VMWare cluster and our OpenShift cluster we are deploying.

openshift-install create install-config --dir=./install-dir

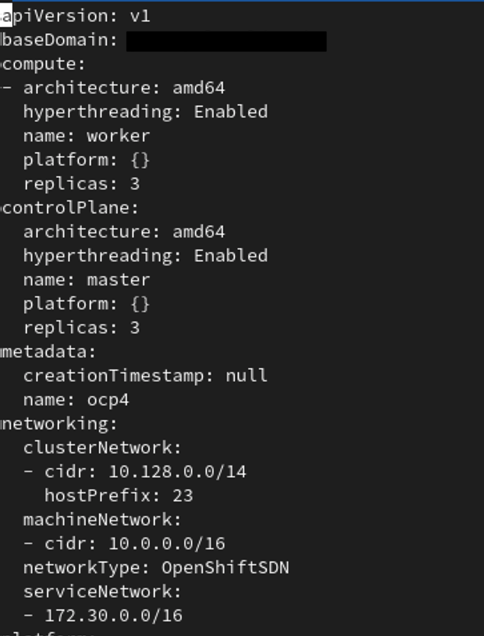
Next we need to edit the newly created install-config.yml in the installation directory we created. It will look like the snippet below in the screenshot. Notice the platform variable is set to {}, we will need to edit this to have the proper amount of resources we want to give our OpenShift cluster VMs.

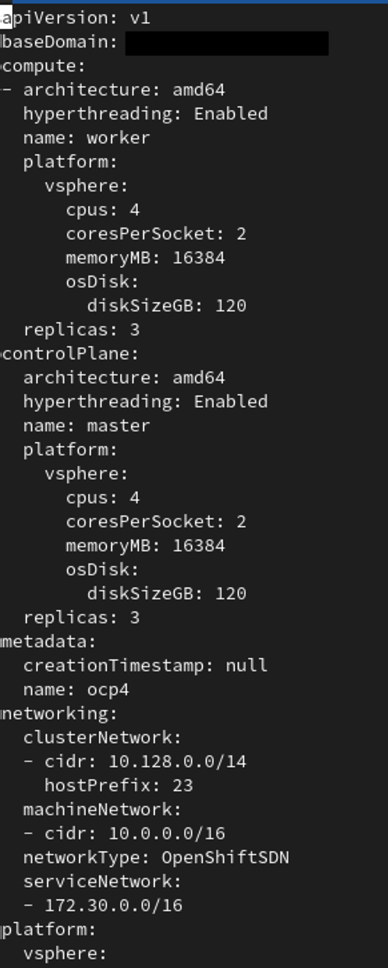
To do this all we need to do is remove the {} and add some new variables to our yaml file to specify the platform (vsphere in this example), cpus, coresPerSocket, memoryMB, and diskSizeGB. Below you will see an example of deploying supervisor and worker nodes with 3 replicas each with 4 CPUs, 2 cores per socket, 16GB of RAM, and 120GB hard drives.

After you have edited the install-config.yml just go ahead and write the file and now we can run the create cluster command to deploy our custom configured OpenShift install.

openshift-install create cluster --dir=./install-dir

Enjoy your newly customized OpenShift cluster!

-Mike

Categories
OpenShift Red Hat

Cluster admin access in OCP 4.x via CLI

In the last blog post we went over how to add users to cluster-admin role in your OpenShift 4.x cluster. In this post I will detail how to make a user a cluster admin using the CLI which I have found to be the quickest method of doing so.

First we will have to log in to the cli using the kubeadmin user to provide cluster-admin level access to the accounts we created before.

oc login https://api.ocp4.example.com:6443

Now that we are logged in as kubeadmin, let’s grant cluster-admin access to a user account.

oc adm policy add-cluster-role-to-user cluster-admin <username>

Once you have done this for all users who need cluster-admin level access let’s login using that user using the oc login command from above. Let’s check that we have cluster-admin access by running the following command.

oc get nodes

This should return the names of the supervisor and worker nodes if successful. Next we will want to remove the temporary cluster-admin kubeadmin. We can do this by running the command below.

oc delete secrets kubeadmin -n kube-system

Congrats you have now setup your OCP users and given them cluster-admin access while removing the default account.

-Mike

Categories
OpenShift Red Hat

Cluster admin access in OCP 4.x via WebUI

In the last blog post we went over how to add users to your OpenShift 4.x cluster using basic htpasswd authentication. In this post I will detail how to make a user a cluster admin so you can remove the default kubeadmin account.

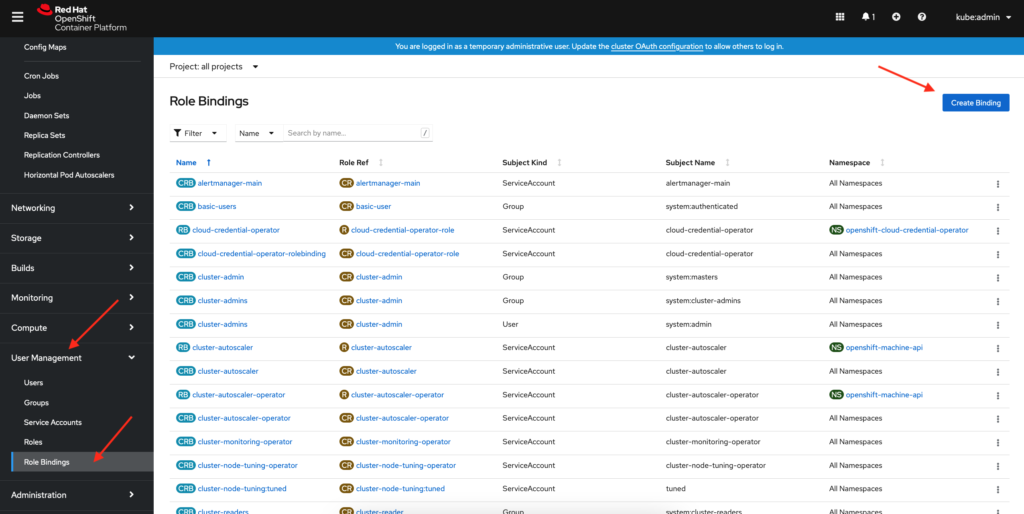
First we will have to log in to the webui using the kubeadmin user to provide cluster-admin level access to the accounts we created before. After you have logged in expand the left hand menu that says User Management followed by clicking Role Bindings and finally Create Binding.

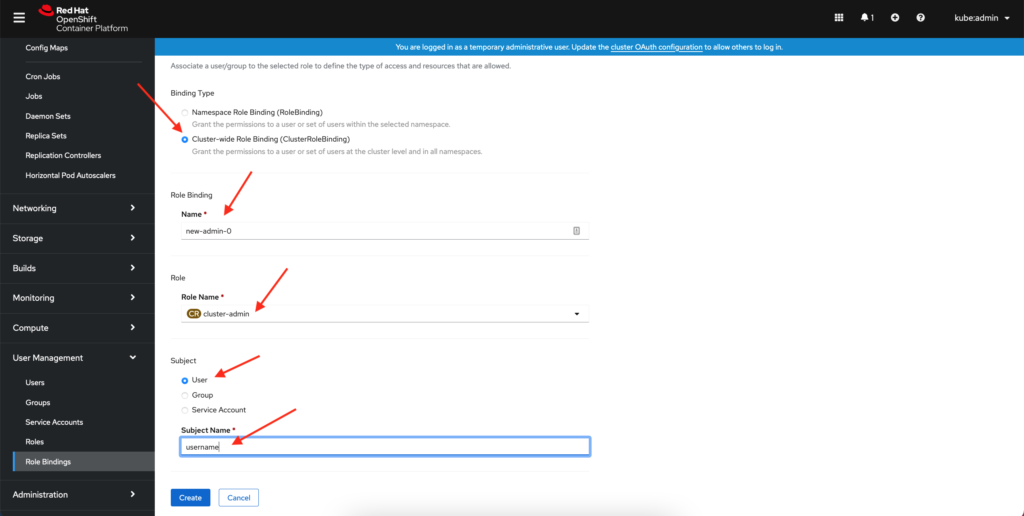
On the next screen we will setup our Role Binding. First we want to specify that this is a Cluster-wide Role Binding by checking the radio button for Binding Type. Next we need to give it a Name; this can be whatever you like. In this example I use new-admin-0. The Role Name we will select is cluster-admin. Finally we will put the username to give cluster-admin access to in the Subject Name box leaving the User radio button selected as seen below.

If all went well we should be able to log out of the webui as kubeadmin and log in as our user we just gave cluster-admin access to. We should have full access to all namespaces/projects like the kubeadmin user did. If so let’s continue on and delete the temporary kubeadmin account.

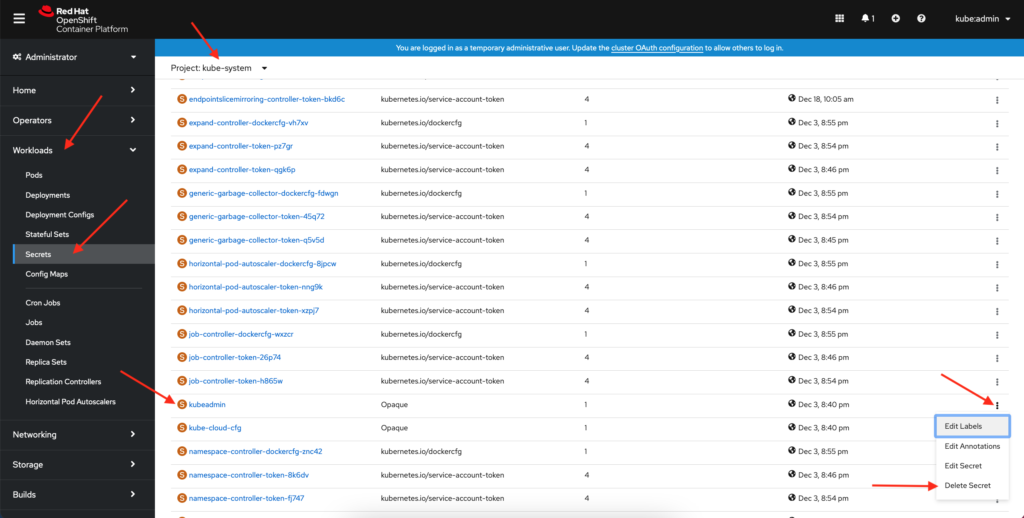
We can do this by clicking Workloads in the left hand menu followed by Secrets. We want to make sure our Project is set to kube-system else you will not see the kubeadmin secret.

Once you have located the kubeadmin secret you can click the 3 vertical dot menu on the right hand side for that secret and select Delete Secret.

Congrats you have successfully added your HTPasswd users to the cluster-admin role and removed the temporary cluster-admin account kubeadmin!

-Mike

Categories
OpenShift Red Hat

HTPasswd Auth in OpenShift 4.x

In this post I will describe how to add basic HTPasswd authentication users to an OpenShift 4.x cluster.

First you will want to create a htpasswd file with all the users you want for your cluster. I will not cover that in this post but you should be able to find tutorials all over the web for doing such. The key here is to make sure you have the file in hand ready to upload to your OCP 4.x cluster.

Log in to your OCP cluster via the web interface using the kubeadmin user that is provided by default after the cluster installation. From here you should have a message at the top saying you’ve logged in using a temporary administrator like the one below.

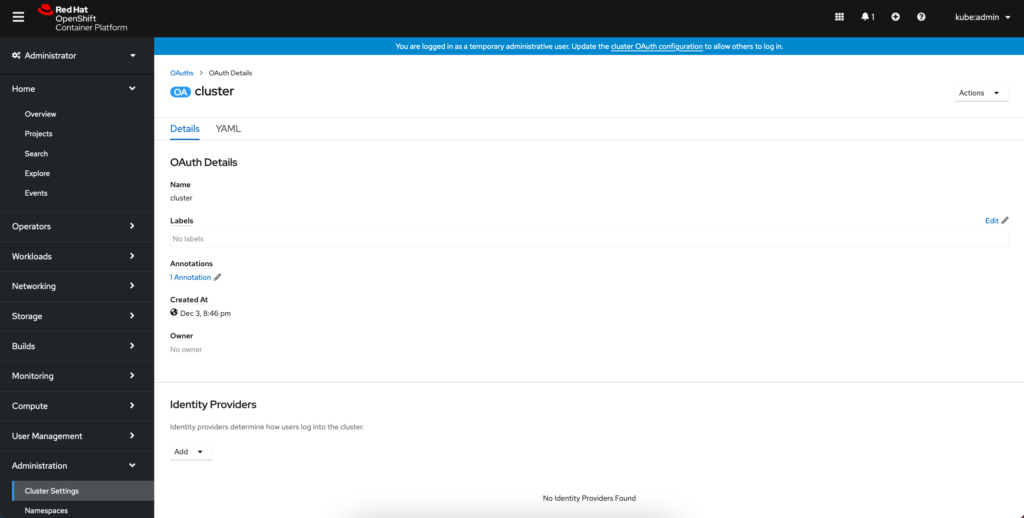
Click the link in that message to take you to the OAuth details page for the cluster where you will have the option to add Identity Providers.

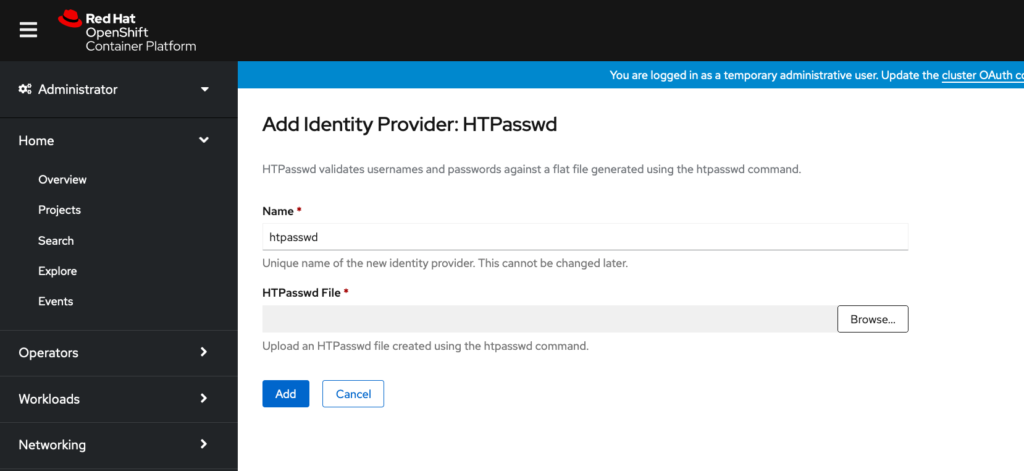
Click on the Add drop down followed by HTPasswd which will take you to the Add Identity Provider: HTPasswd page.

From here you will browse for your .htpasswd file and click the Add button. This will create the custom resource and secret needed to do authentication via HTPasswd.

In the next post I will discuss how to adding the cluster-admin role to these users.

-Mike

Categories
Containers OpenShift Red Hat

PostgreSQL on OpenShift 4.x

I had a little side project that used a PostgreSQL database for the backend and was initially deployed on a virtual machine. Well we wanted to modernize the deployment and move the database to OpenShift 4.6 using containers. In this post I will detail a quick and dirty way to take a PostgreSQL backup file and restore on top of OCP.

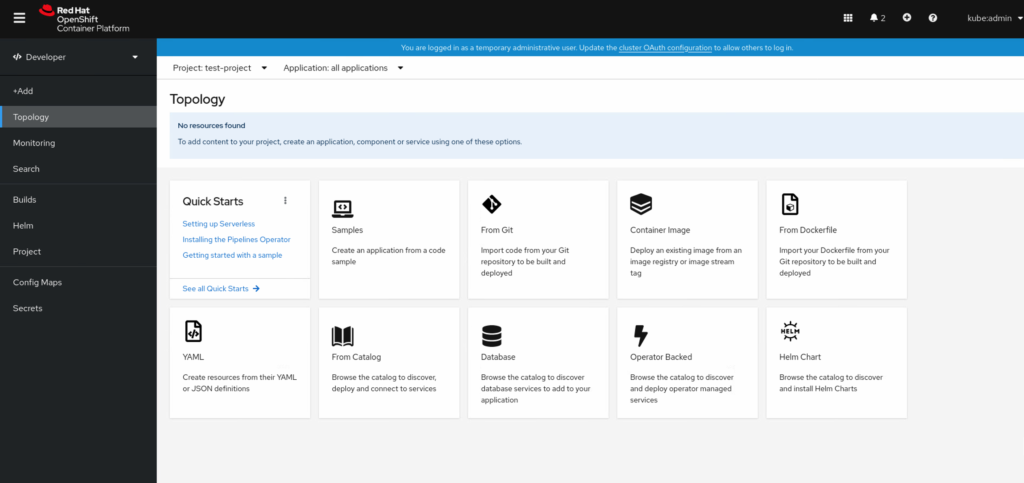
We will do the first half of this tutorial using the web ui and wrap it up with the cli. From the developer view we will click add from the left menu and select database.

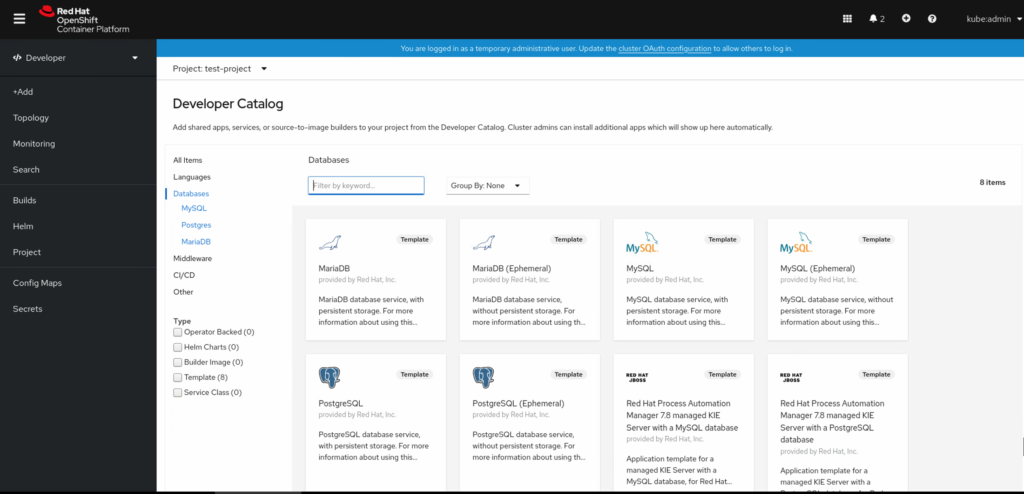
Now we will look for PostgreSQL in the developer catalog and select it. Note we want to use the option without ephemeral in it’s name.

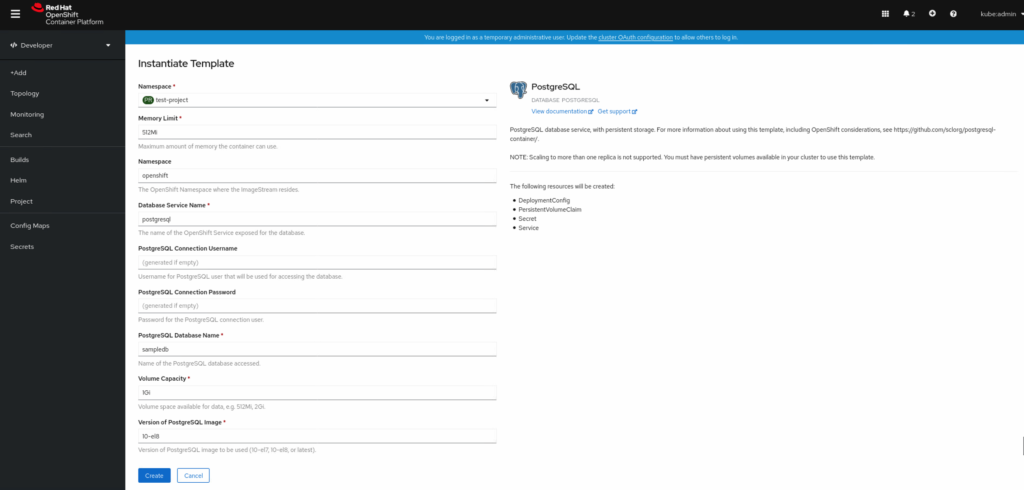
Next we are prompted with our template options before deployment. Go ahead and fill out this information according to your needs and click create. Do note the default as of 11/9/2020 deploys PostgreSQL 10.8 but we can change the version of the PostgreSQL image used to latest to get version 12.

Finally we are going to switch to the cli and import or backup that we made using pgdump. Once you are logged into oc you will want to run the following command.

oc get pods

Ignore the pod ending in deploy with status completed, what we want is the running container that ends in 5 random characters. Now let’s setup a port-forward to our local machine with the pgdump file in hand.

oc port-forward my-database-54dfv 5432:5432

Where the my-database-54dfv is the name we obtained from the oc get pods command we ran earlier and the ports are local:remote so if you want to change the local port you may if you are doing this from the actual VM already running PostgreSQL.

Once we have the port-forward setup for our local machine now we just need to import our database backup with the following.

psql database-name username --host 127.0.0.1 < /path/to/pgdump-file

Congrats you should now have your database restored and running in a container that can be accessed by the service name you provided during creation.

-Mike

Categories
Linux Virtualization

Ovirt v4.4.0 on Ovirt Node

Getting Ovirt self hosted engine up and running on Ovirt node is even easier and the preferred operating system of choice. It is basically a trimmed down version of CentOS 8 with just the bits needed to run the Ovirt platform.

To get started we will download and install the latest version of Ovirt node from the Ovirt website.

Once we have the base OS installed and ready we just need to login and start the installation process.

tmux
sudo hosted-engine --deploy

Follow along and answer all the question prompts. It will take the install process awhile depending on hardware specs.

Happy virtualizing!

-Mike