Categories
OpenShift Red Hat Virtualization

Custom OpenShift VMWare IPI Deployments

In the past few posts I have written how to do some basic setup tasks once you have a OpenShift deployment up and running. I figured I should backpedal a little here and discuss how to do a custom OpenShift deployment on VMWare using the IPI deployment method.

To start when you do a basic deployment of OpenShift with the openshift-install binary you get a basic cluster with 3x supervisor nodes and 3x worker nodes. While this is great for folks interested in just getting to know OpenShift, if you are deploying production workloads you may want to increase the supervisor/worker node counts.

By default the 3x worker nodes are deployed 2x CPU counts with a single core on each socket, 8GB of RAM, and 120GB hard drive. Well if you wanted to increase these default values, you are in luck; I will detail that process below!

First we need to create a directory to hold our custom install-config.yml and installation files for our cluster.

mkdir install-dir

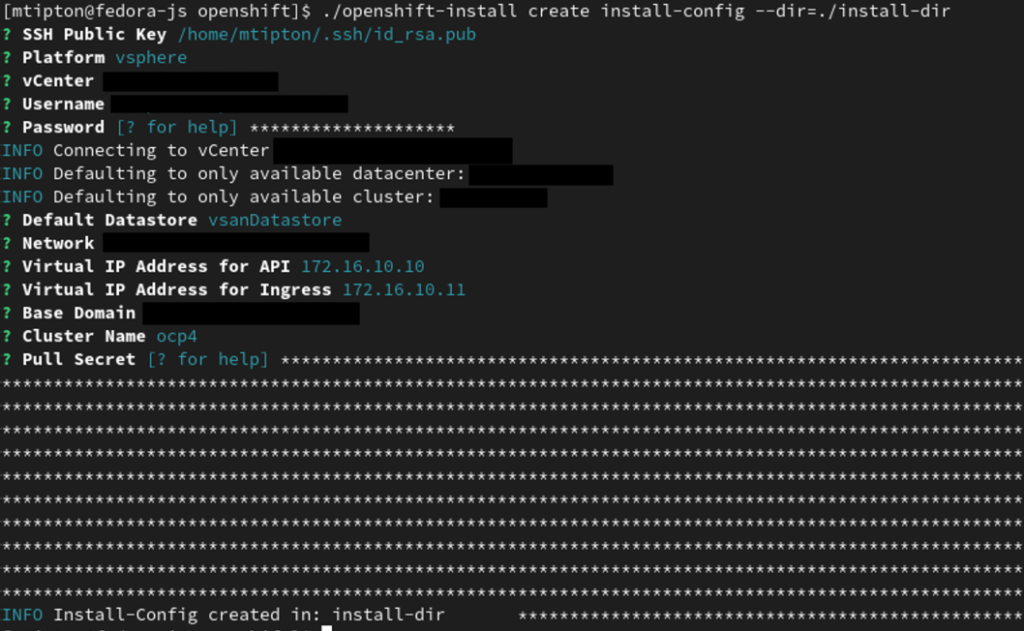
Next we want to create our custom install-config.yml used to spin up our custom OpenShift cluster deployment. We can do this using the openshift-install cli tool by running the following command and filling in all the necessary information about our VMWare cluster and our OpenShift cluster we are deploying.

openshift-install create install-config --dir=./install-dir
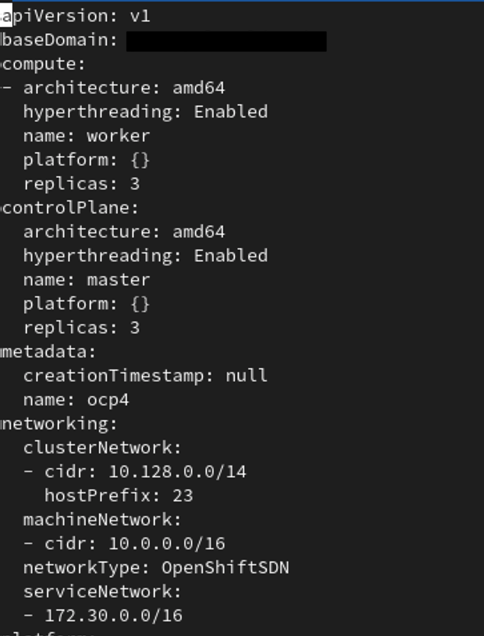
Next we need to edit the newly created install-config.yml in the installation directory we created. It will look like the snippet below in the screenshot. Notice the platform variable is set to {}, we will need to edit this to have the proper amount of resources we want to give our OpenShift cluster VMs.
To do this all we need to do is remove the {} and add some new variables to our yaml file to specify the platform (vsphere in this example), cpus, coresPerSocket, memoryMB, and diskSizeGB. Below you will see an example of deploying supervisor and worker nodes with 3 replicas each with 4 CPUs, 2 cores per socket, 16GB of RAM, and 120GB hard drives.
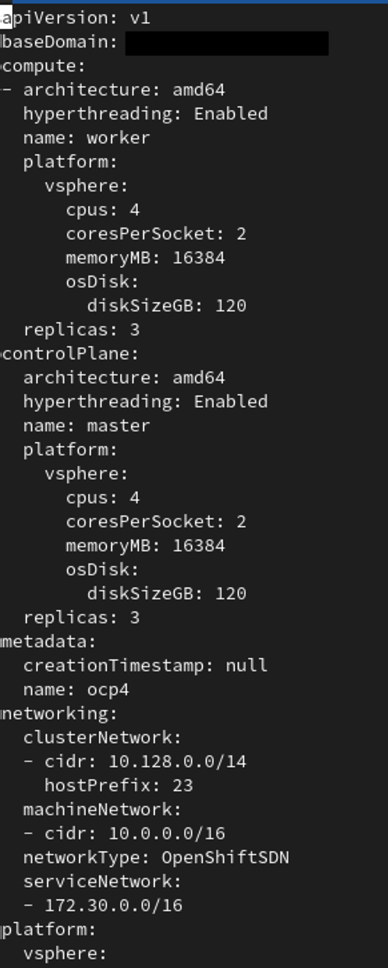
After you have edited the install-config.yml just go ahead and write the file and now we can run the create cluster command to deploy our custom configured OpenShift install.

openshift-install create cluster --dir=./install-dir

Enjoy your newly customized OpenShift cluster!

-Mike

Categories
Linux Virtualization

Ovirt v4.4.0 on Ovirt Node

Getting Ovirt self hosted engine up and running on Ovirt node is even easier and the preferred operating system of choice. It is basically a trimmed down version of CentOS 8 with just the bits needed to run the Ovirt platform.

To get started we will download and install the latest version of Ovirt node from the Ovirt website.

Once we have the base OS installed and ready we just need to login and start the installation process.

tmux
sudo hosted-engine --deploy

Follow along and answer all the question prompts. It will take the install process awhile depending on hardware specs.

Happy virtualizing!

-Mike

Categories
CentOS Linux Virtualization

Ovirt v4.4.0 on CentOS 8

Edit: 7/4/2020 – Updated and preferred install guide here.

We will be using CentOS 8 as our base operating system to install Ovirt v4.4.0 self hosted engine today. As a matter of fact CentOS 7 is not supported as a base OS starting with version 4.4.0 and future revisions. So once we have our OS installed, let’s start by making sure we are up to date.

sudo yum update -y && sudo yum install tmux -y

To install Ovirt 4.4 we need to setup the repository to install it and all of it’s dependencies.

sudo yum localinstall -y https://resources.ovirt.org/pub/yum-repo/ovirt-release44.rpm

Now that we have the repo, we need we can continue with our installing the hosted engine setup tool.

sudo yum install -y ovirt-hosted-engine-setup

Before continuing I recommend you picking a static IP to assign to your Ovirt manager VM and pointing your hostname to it via your DNS server of choice before running the installation process.

Once you have that all squared away you are free to begin the deployment process.

tmux
sudo hosted-engine --deploy

Follow along and answer all the question prompts. It will take the install process awhile depending on hardware specs.

Once the Ovirt manager VM is successfully deployed it will ask you for the storage domain you would like to use. Enter your storage of choice, again we are using NFS in this example.

When finished you may login using username/password at the hostname you configured for the Ovirt manager VM during deployment.

Happy virtualizing!

-Mike

Categories
CentOS Linux Virtualization

Ovirt v4.3.10 on CentOS 7

Edit: 6/29/2020 – Make sure you check out the updated install guide if spinning up a new Ovirt cluster.

Now that we’ve got our NFS storage all configured and ready to go from the previous post; let’s install Ovirt 4.3.10 on CentOS 7. I’ll be using the self hosted engine install option and of course NFS as our storage domain provider.

As always we are starting with the latest updates for our base OS, CentOS 7 in this case. I’ll detail the CentOS 8 install in an upcoming blog post soon. It’s very much the same process with minor changes.

sudo yum update -y && sudo yum install -y screen

To install Ovirt we need to setup the repository to install it and all of it’s dependencies.

sudo yum localinstall -y https://resources.ovirt.org/pub/yum-repo/ovirt-release43.rpm

Now that we have the repo, we need we can continue with our installing the hosted engine setup tool.

sudo yum install -y ovirt-hosted-engine-setup

Before continuing I recommend you picking a static IP to assign to your Ovirt manager VM and pointing your hostname for that VM to the IP before running the installation process..

Once you have that all squared away you are free to begin the deployment process.

screen
sudo hosted-engine --deploy

Follow along and answer all the question prompts. It will take the install process awhile depending on hardware specs.

Once the Ovirt manager VM is successfully deployed it will ask you for the storage domain you would like to use. Enter your storage of choice, again we are using NFS in this example.

When finished you may login to your cluster at the hostname you configured for the Ovirt manager VM.

Happy virtualizing!

-Mike

Categories
Linux RHEL Virtualization

Nested Virtualization on RHV 4.3

While diving into Red Hat virtualization, I wanted to do some nested virtualization on my Intel NUC. In order to do nested virtualization on RHV 4.3 there are a few things you must configure. Please note that this feature is in tech preview currently.

First we need to check to make sure that nested virtualization is enabled on our host node. The Fedora docs have a great page for this. https://docs.fedoraproject.org/en-US/quick-docs/using-nested-virtualization-in-kvm/

In order to enable nested virtualization in RHV. You will need to pin the VM that you want to use it on to a particular host and disallow migration of that VM using live migration features. For me since this is a single NUC.

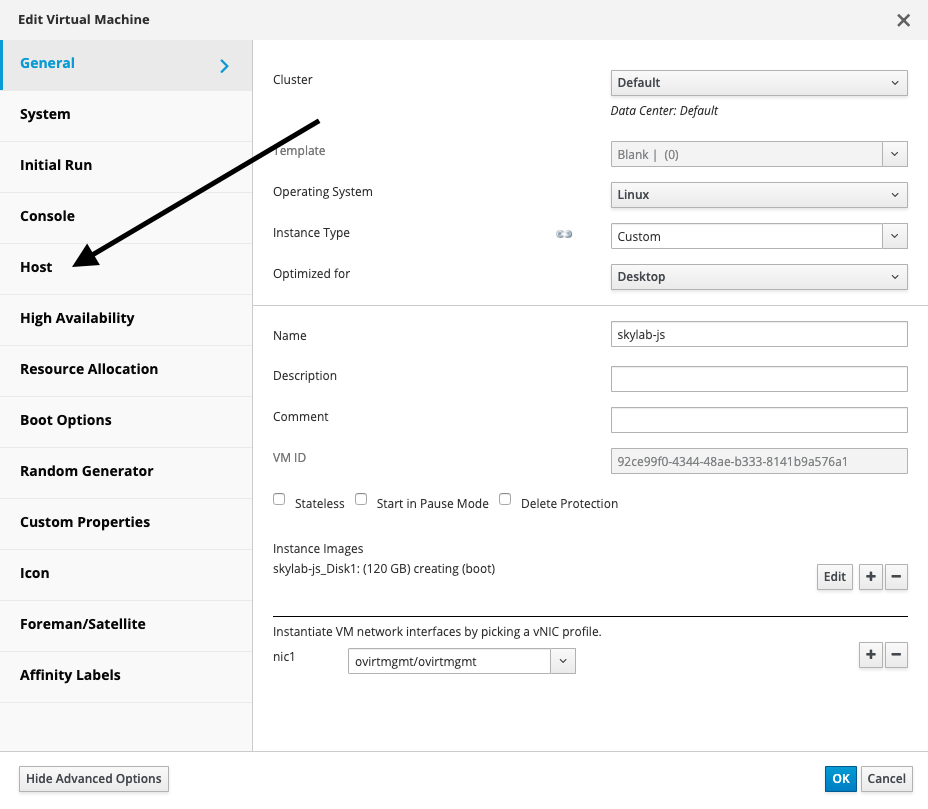
When building a new virtual machine or editing an existing one you will be looking at a screen that looks like the one below. Click on the ‘Host’ tab.

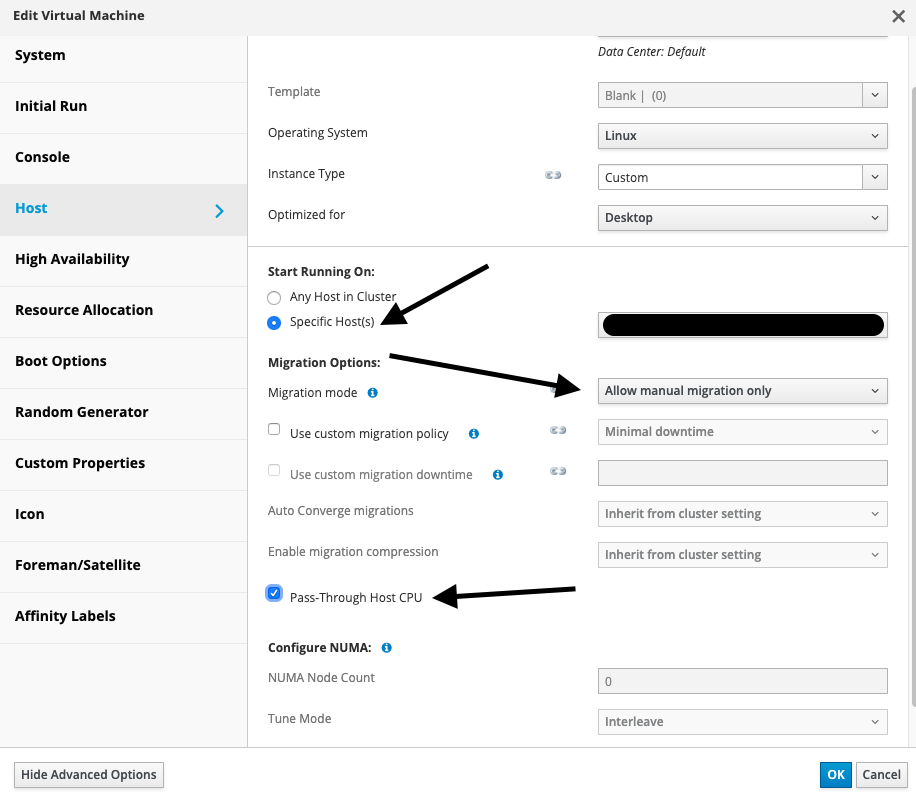
After you click on the host tab you will be looking at a screen similar to the screenshot below. You will want to pin the VM to a particular host, set the migration mode to Allow manual migration only. Once this is completed the Pass-Through Host CPU button will be enabled for use.

Now you will be able to do nested virtualization inside that particular VM. Repeat for any additional VMs you would like to have nested virtualization enabled.

Happy Nesting! – Mike