Categories
CentOS Linux Virtualization

Ovirt v4.4.0 on CentOS 8

Edit: 7/4/2020 – Updated and preferred install guide here.

We will be using CentOS 8 as our base operating system to install Ovirt v4.4.0 self hosted engine today. As a matter of fact CentOS 7 is not supported as a base OS starting with version 4.4.0 and future revisions. So once we have our OS installed, let’s start by making sure we are up to date.

sudo yum update -y && sudo yum install tmux -y

To install Ovirt 4.4 we need to setup the repository to install it and all of it’s dependencies.

sudo yum localinstall -y https://resources.ovirt.org/pub/yum-repo/ovirt-release44.rpm

Now that we have the repo, we need we can continue with our installing the hosted engine setup tool.

sudo yum install -y ovirt-hosted-engine-setup

Before continuing I recommend you picking a static IP to assign to your Ovirt manager VM and pointing your hostname to it via your DNS server of choice before running the installation process.

Once you have that all squared away you are free to begin the deployment process.

tmux
sudo hosted-engine --deploy

Follow along and answer all the question prompts. It will take the install process awhile depending on hardware specs.

Once the Ovirt manager VM is successfully deployed it will ask you for the storage domain you would like to use. Enter your storage of choice, again we are using NFS in this example.

When finished you may login using username/password at the hostname you configured for the Ovirt manager VM during deployment.

Happy virtualizing!

-Mike

Categories
CentOS Linux Virtualization

Ovirt v4.3.10 on CentOS 7

Edit: 6/29/2020 – Make sure you check out the updated install guide if spinning up a new Ovirt cluster.

Now that we’ve got our NFS storage all configured and ready to go from the previous post; let’s install Ovirt 4.3.10 on CentOS 7. I’ll be using the self hosted engine install option and of course NFS as our storage domain provider.

As always we are starting with the latest updates for our base OS, CentOS 7 in this case. I’ll detail the CentOS 8 install in an upcoming blog post soon. It’s very much the same process with minor changes.

sudo yum update -y && sudo yum install -y screen

To install Ovirt we need to setup the repository to install it and all of it’s dependencies.

sudo yum localinstall -y https://resources.ovirt.org/pub/yum-repo/ovirt-release43.rpm

Now that we have the repo, we need we can continue with our installing the hosted engine setup tool.

sudo yum install -y ovirt-hosted-engine-setup

Before continuing I recommend you picking a static IP to assign to your Ovirt manager VM and pointing your hostname for that VM to the IP before running the installation process..

Once you have that all squared away you are free to begin the deployment process.

screen
sudo hosted-engine --deploy

Follow along and answer all the question prompts. It will take the install process awhile depending on hardware specs.

Once the Ovirt manager VM is successfully deployed it will ask you for the storage domain you would like to use. Enter your storage of choice, again we are using NFS in this example.

When finished you may login to your cluster at the hostname you configured for the Ovirt manager VM.

Happy virtualizing!

-Mike

Categories
CentOS Linux Random Storage

NFS Setup for RHV and Ovirt

Today I will detail how to configure a NFS server to be used as a storage domain provider for Red Hat Virtualization (RHV) or Ovirt. I will be using CentOS as my NFS OS but this will also work with RHEL.

After we have our base OS installed we want to go ahead and update to the latest verison. Followed by installing nfs-utils for get our NFS server up and going.

sudo yum update -y
sudo yum install nfs-utils -y
sudo reboot #if needed

Now let’s enable our nfs service and open our firewall ports.

sudo systemctl enable --now nfs-server
sudo systemctl enable --now rpcbind
sudo firewall-cmd --add-service=nfs --permanent
sudo firewall-cmd --add-service=rpc-bind --permanent
sudo firewall-cmd --add-service=mountd --permanent
sudo firewall-cmd --reload

From here we will want to create our directories we want to export. Normally there are 3 different domains you need; export, iso, and data. I will be making these in my users home directory to make it easy since the OS installer provisions more free space to /home.

mkdir ~/{export,iso,data}
chmod 0755 ~/{export,iso,data}
sudo chown 36:36 /home/<username>/{export,iso,data}

Because we are using the home directory for NFS we need to edit our SE Linux boolean value to allow this behavior.

sudo setsebool -P use_nfs_home_dirs 1

From here we just need to configure our exports and restart the nfs server and we are off to the races!

sudo vi /etc/exports

Add the following lines to the exports file, save the file, and restart the nfs service.

/home/<username>/export *(rw,sync)
/home/<username>/data *(rw,sync)
/home/<username>/iso *(rw,sync)


sudo systemctl restart nfs-server

Note you can replace the * in the above file with the IP of the server or even the subnet to only allow access to certain IPs/networks. See exports man page for more details.

Now because I don’t like typing long paths for my NFS server let’s create some symlinks for the directories we created above.

sudo ln -s /home/<username>/data /data
sudo ln -s /home/<username>/export /export
sudo ln -s /home/<username>/iso /iso

Tada your NFS server is ready to serve data for your virtualization platform!

-Mike

Categories
Ansible Automation Red Hat RHEL

Ansible Tower v3.7.1 Install

I will run through the quick install steps for getting Ansible Tower v3.7.1 the latest as of this post up and going in my home lab.

Go a head and install RHEL/CentOS 7 or 8 whatever your personal preference is. I will be installing Ansible Tower in a connected environment on a RHEL 7 VM in this example.

First get your OS installed, configured, and updated. Make sure your hostname is resolvable via DNS as well.

subscription-manager register
subscription-manager attach --pool=<POOLID>
subscription-manager repos --enable rhel-7-server-ansible-2-rpms

yum update -y && yum install wget ansible -y

Download the appropriate installer bundle for your OS from the ansible website repository.

wget https://releases.ansible.com/ansible-tower/setup-bundle/ansible-tower-setup-bundle-latest.el7.tar.gz
tar -xvf ansible-tower*.tar.gz
cd ansible-tower*/

Now let’s edit the inventory file to configure our deployment type based on the documentation and preference. I will be doing a single node with internal database install for simplicity’s sake.

vi inventory

I will edit the admin_password and pg_password in my inventory file and I am ready to begin the installation process.

sh setup.sh

After the install has completed we can browser to the hostname of our tower install and you should be prompted to login. Do so with the password you set in your inventory file from the previous step.

Next we will be prompted for our license key. You may sign up for a trial key if you do not already have one by visiting the this link.

Upload your key file or if fully subscribed then use the RHN login box to find your subscription from the customer portal.

Happy Automating!

Categories
Linux Red Hat RHEL Satellite

Red Hat Satellite 6.5 -> 6.6 Upgrade

Standard warning do not do this in a production environment, follow official documentation, always make a backup, yadda, yadda, yadda, so on and so forth.

Anyways so I had an install of Red Hat Satellite to manage some of my personal work labs that was running version 6.5.3. In this post I will detail how I upgraded my Satellite install to version 6.6.3.

First let’s check what versions of Satellite are available to us.

sudo foreman-maintain upgrade list-versions

If all goes well we should get available versions of which 6.6 we will be choosing. Next we will want to run a check to make sure all is well before proceeding with our update.

sudo foreman-maintain upgrade check --target-version 6.6

Install any prerequisites you maybe missing and if the check comes back successfully then we may kick off the upgrade process.

sudo foreman-maintain upgrade run --target-version 6.6

Make sure you confirm the upgrade process when prompted to do so. If all goes well run this final command.

sudo hash -d foreman-maintain service 2> /dev/null

You should have a fully upgraded Red Hat Satellite server now running version 6.6!

-Mike

Categories
Containers OpenShift RHEL

OpenShift Origin 3.11 on RHEL 7

OpenShift Origin (OKD) 3.11 on a single node while using RHEL 7 can be a bit different than the CentOS 7 install. In this article I will cover those instructions. We will assume you have installed the latest version of RHEL 7 on your node that you will be deploying on.

From there you will want to log in and update the system after enabling the repos we need.

sudo subscription-manager repos --disable "*"

sudo subscription-manager repos --enable=rhel-7-server-rpms --enable=rhel-7-server-extras-rpms

sudo yum update -y

Next we will install the dependencies we need to continue followed by a reboot.

sudo yum install -y python3-pip python-devel git && sudo yum group install -y "Development Tools" && sudo reboot

Now that we have our dependencies installed and our system up to date we will want to clone the openshift-ansible install from github.

git clone https://github.com/openshift/openshift-ansible
cd openshift-ansible
git checkout release-3.11

Now we will install the python dependencies using pip we installed earlier.

sudo pip3 install -r requirements.txt

Finally we run the two playbooks needed to deploy the standalone 3.11 version of OpenShift on RHEL 7.

sudo /usr/local/bin/ansible-playbook -i inventory/hosts.localhost playbooks/prerequisites.yml
sudo /usr/local/bin/ansible-playbook -i inventory/hosts.localhost playbooks/deploy_cluster.yml

Enjoy your OpenShift Origin 3.11 test environment on RHEL 7!

Categories
CentOS Containers Linux OpenShift

OpenShift Origin 3.11 on CentOS 7

I had a friend who was having some issues with installing OpenShift Origin (OKD) 3.11 on a single node so I took to documenting my steps taken for my test deployment. We will assume you have installed the latest version of CentOS on your node that you will be deploying on.

From there you will want to log in and update the system.

sudo yum update -y

Next we will install the dependencies we need to continue followed by a reboot.

sudo yum install -y epel-release && sudo yum install -y python-pip python-devel git && sudo yum group install -y "Development Tools" && sudo reboot

Now that we have our dependencies installed and our system up to date we will want to clone the openshift-ansible install from github.

git clone https://github.com/openshift/openshift-ansible
cd openshift-ansible
git checkout release-3.11

Now we will install the python dependencies using pip we installed earlier.

sudo pip install -r requirements.txt

Finally we run the two playbooks needed to deploy the standalone 3.11 version of OpenShift on CentOS 7.

sudo ansible-playbook -i inventory/hosts.localhost playbooks/prerequisites.yml
sudo ansible-playbook -i inventory/hosts.localhost playbooks/deploy_cluster.yml

Enjoy your OpenShift Origin 3.11 test environment!

Categories
Linux RHEL Virtualization

Nested Virtualization on RHV 4.3

While diving into Red Hat virtualization, I wanted to do some nested virtualization on my Intel NUC. In order to do nested virtualization on RHV 4.3 there are a few things you must configure. Please note that this feature is in tech preview currently.

First we need to check to make sure that nested virtualization is enabled on our host node. The Fedora docs have a great page for this. https://docs.fedoraproject.org/en-US/quick-docs/using-nested-virtualization-in-kvm/

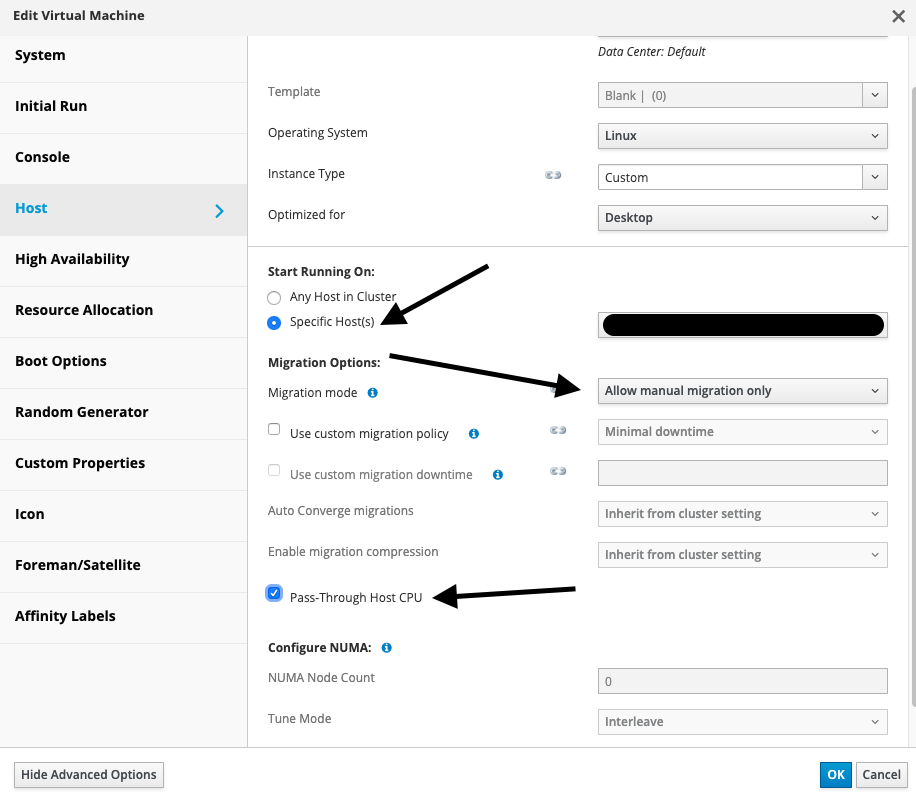
In order to enable nested virtualization in RHV. You will need to pin the VM that you want to use it on to a particular host and disallow migration of that VM using live migration features. For me since this is a single NUC.

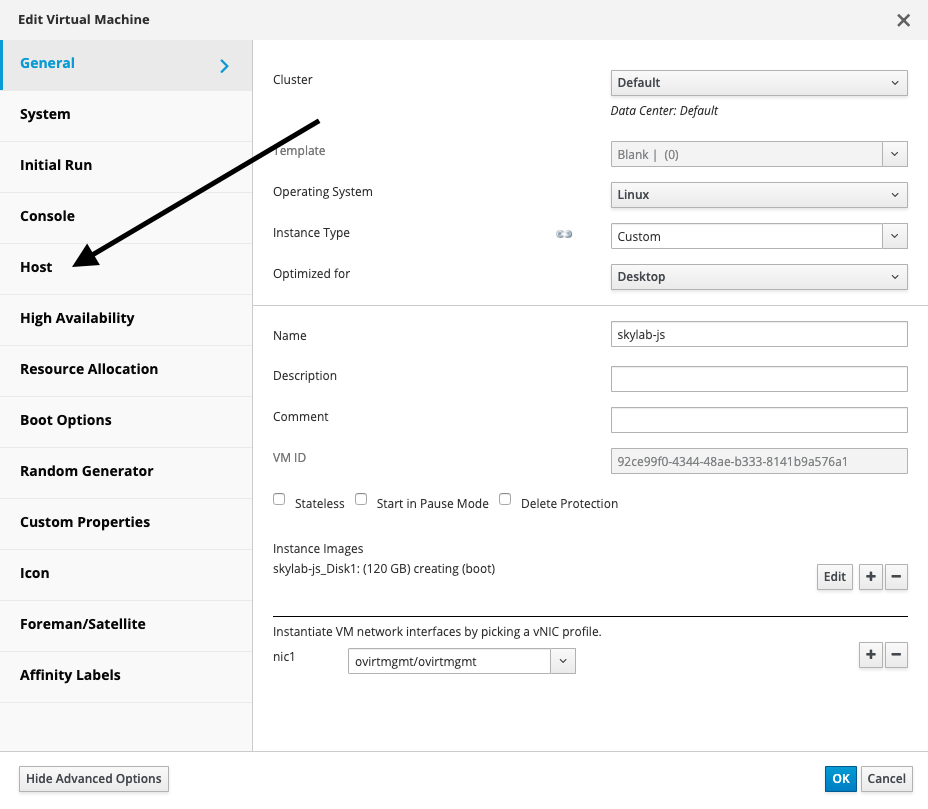
When building a new virtual machine or editing an existing one you will be looking at a screen that looks like the one below. Click on the ‘Host’ tab.

After you click on the host tab you will be looking at a screen similar to the screenshot below. You will want to pin the VM to a particular host, set the migration mode to Allow manual migration only. Once this is completed the Pass-Through Host CPU button will be enabled for use.

Now you will be able to do nested virtualization inside that particular VM. Repeat for any additional VMs you would like to have nested virtualization enabled.

Happy Nesting! – Mike

Categories
Fedora General Linux

Fedora 31 Update Review

Over the past week I updated my main machine from Fedora 30 to Fedora 31. I figured I would write a quick post about the overall experience thus far. I can say that overall the performance seems snappy than it was in Fedora 30. That being said I did run into a few bugs along the way.

The first bug I ran into was the dash-to-dock bug. After updating dash-to-dock settings would work but the dock would not appear on the desktop. I found that a updated RPM build was already available to the community and once applying the updated RPM from the software store and logging out and back in resolved my issues.

The second bug that reared it’s head wasn’t really a bug per se. I run a samba share on my main machine to share content to other machines on my main network. I went to browse my share to find it not working. Running smbtree on my machine failed to return anything but smbclient was working just fine but I saw a note about SMB1 protocol being disabled.

After a bit of digging I found that the new version of smb/nmb (4.11.0) that came with Fedora 31 had disabled SMB1 protocol by default. This older bug report lead me to the final conclusion. After updating my client’s autofs configs to add vers=3.0 everything was back in order and working.

Overall it was a great experience in comparison to some of my past major revision updates. I did have to reset my wallpaper as part of the screen was ‘torn’ but DKMS handled the nvidia kmod on the new kernel without issues, which was pleasantly surprising.

-Mike

Categories
Linux Random Windows

Windows 10 + WSL + Cmder + neofetch = <3

Sometimes we have no choice of what operating system we have to run in our work environments. Many of us stick to our old ways using putty or cygwin to get by. I wanted something more so I went looking and this is what I have come up with. Multiple tabbed terminal sessions and all your native linux options at your fingers tips in windows with a little added rice. 😉

First you want to install WSL and a flavor of Ubuntu from the Windows store. Once we have our ubuntu environment ready, lets update it. Launch it and run the following commands:

sudo apt-get update && apt-get upgrade

Then you will want to install neofetch in our Ubuntu environment. Follow the correct instructions for your version of Ubuntu installed.

Conemu seems to do something weird with the title display in neofetch so lets fix that first.


neofetch
vi ~/.config/neofetch/config.conf

Add the following above info title
info line_break
:wq!

Now we need to set our distro logo and set it to run on launch.

vi ~/.bash_aliases
alias neofetch2="neofetch \
--ascii_distro windows10 \
--line_wrap off \
--bold on \
--uptime_shorthand on
"
:wq!

vi ~/.bashrc

At the very bottom of the file add the following:

cd ~
neofetch2
:wq!

Now lets wrap this up by configuring cmder. Download and extract the latest version of cmder from here. Run cmder, once open right click on the top bar and select settings. Change your default startup task to {WSL:bash} and save your settings. The end result will look like the image at the top of this post.

-Mike